DIY Chalkboard Wall

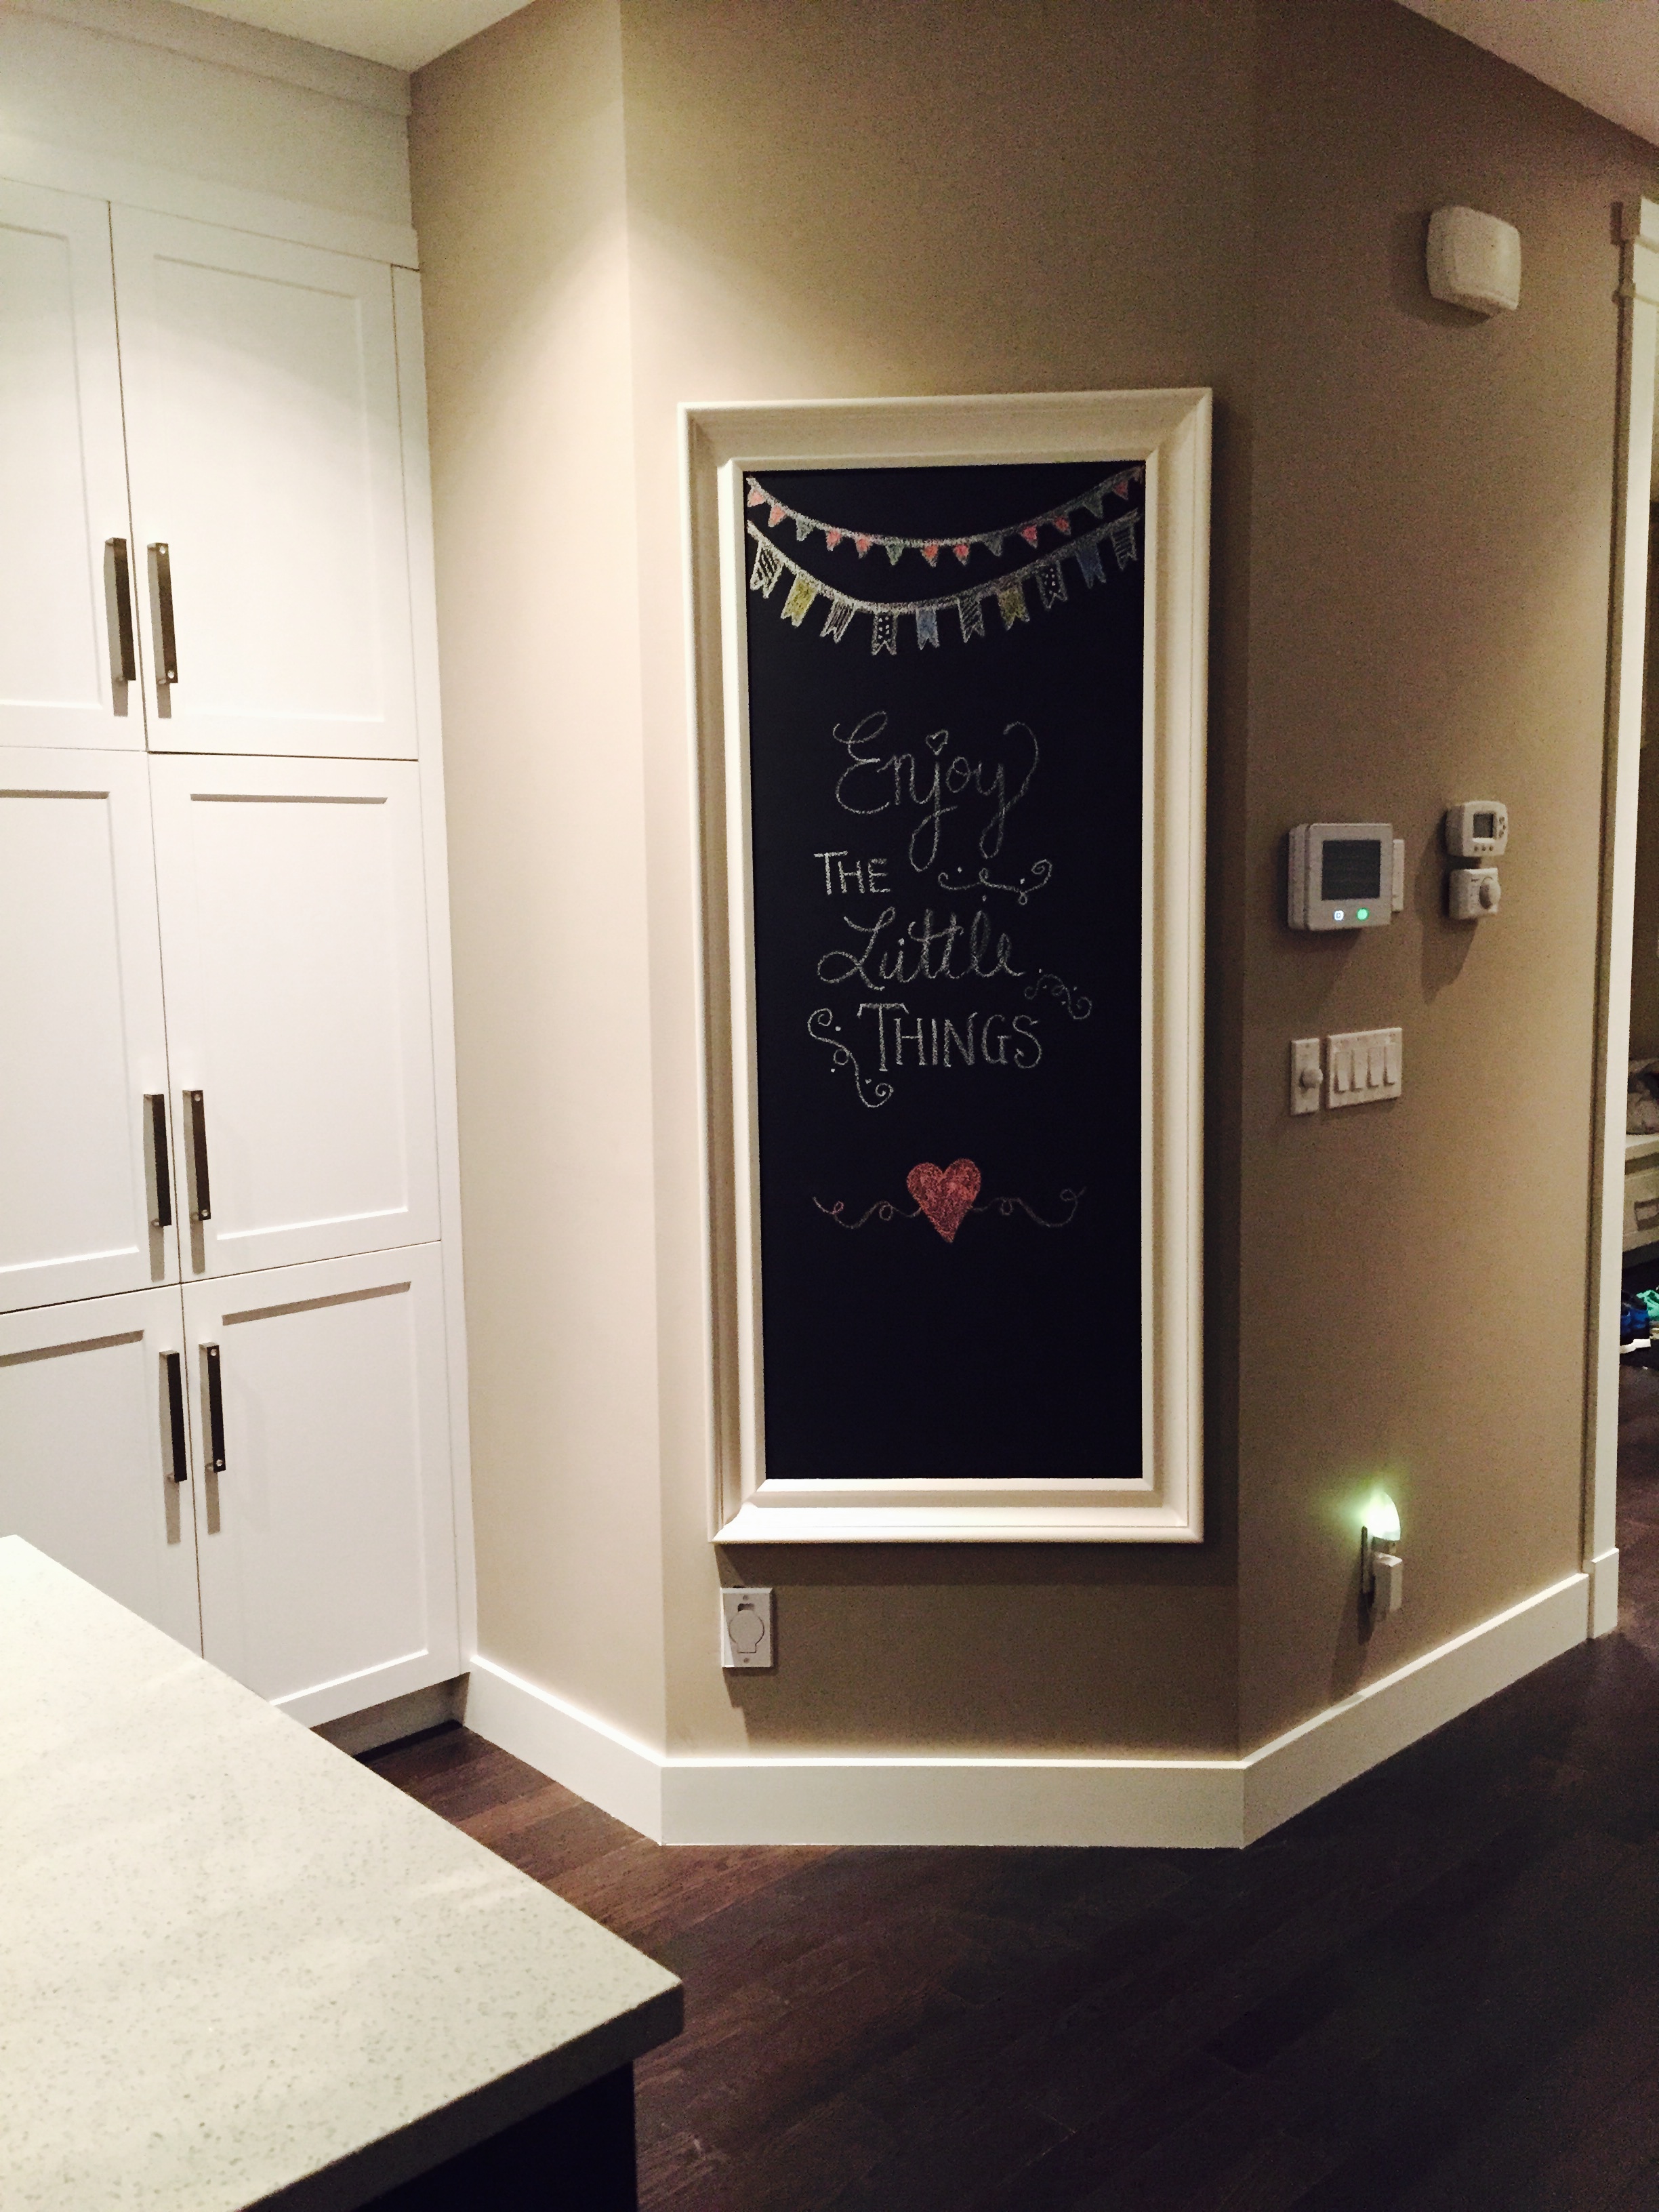
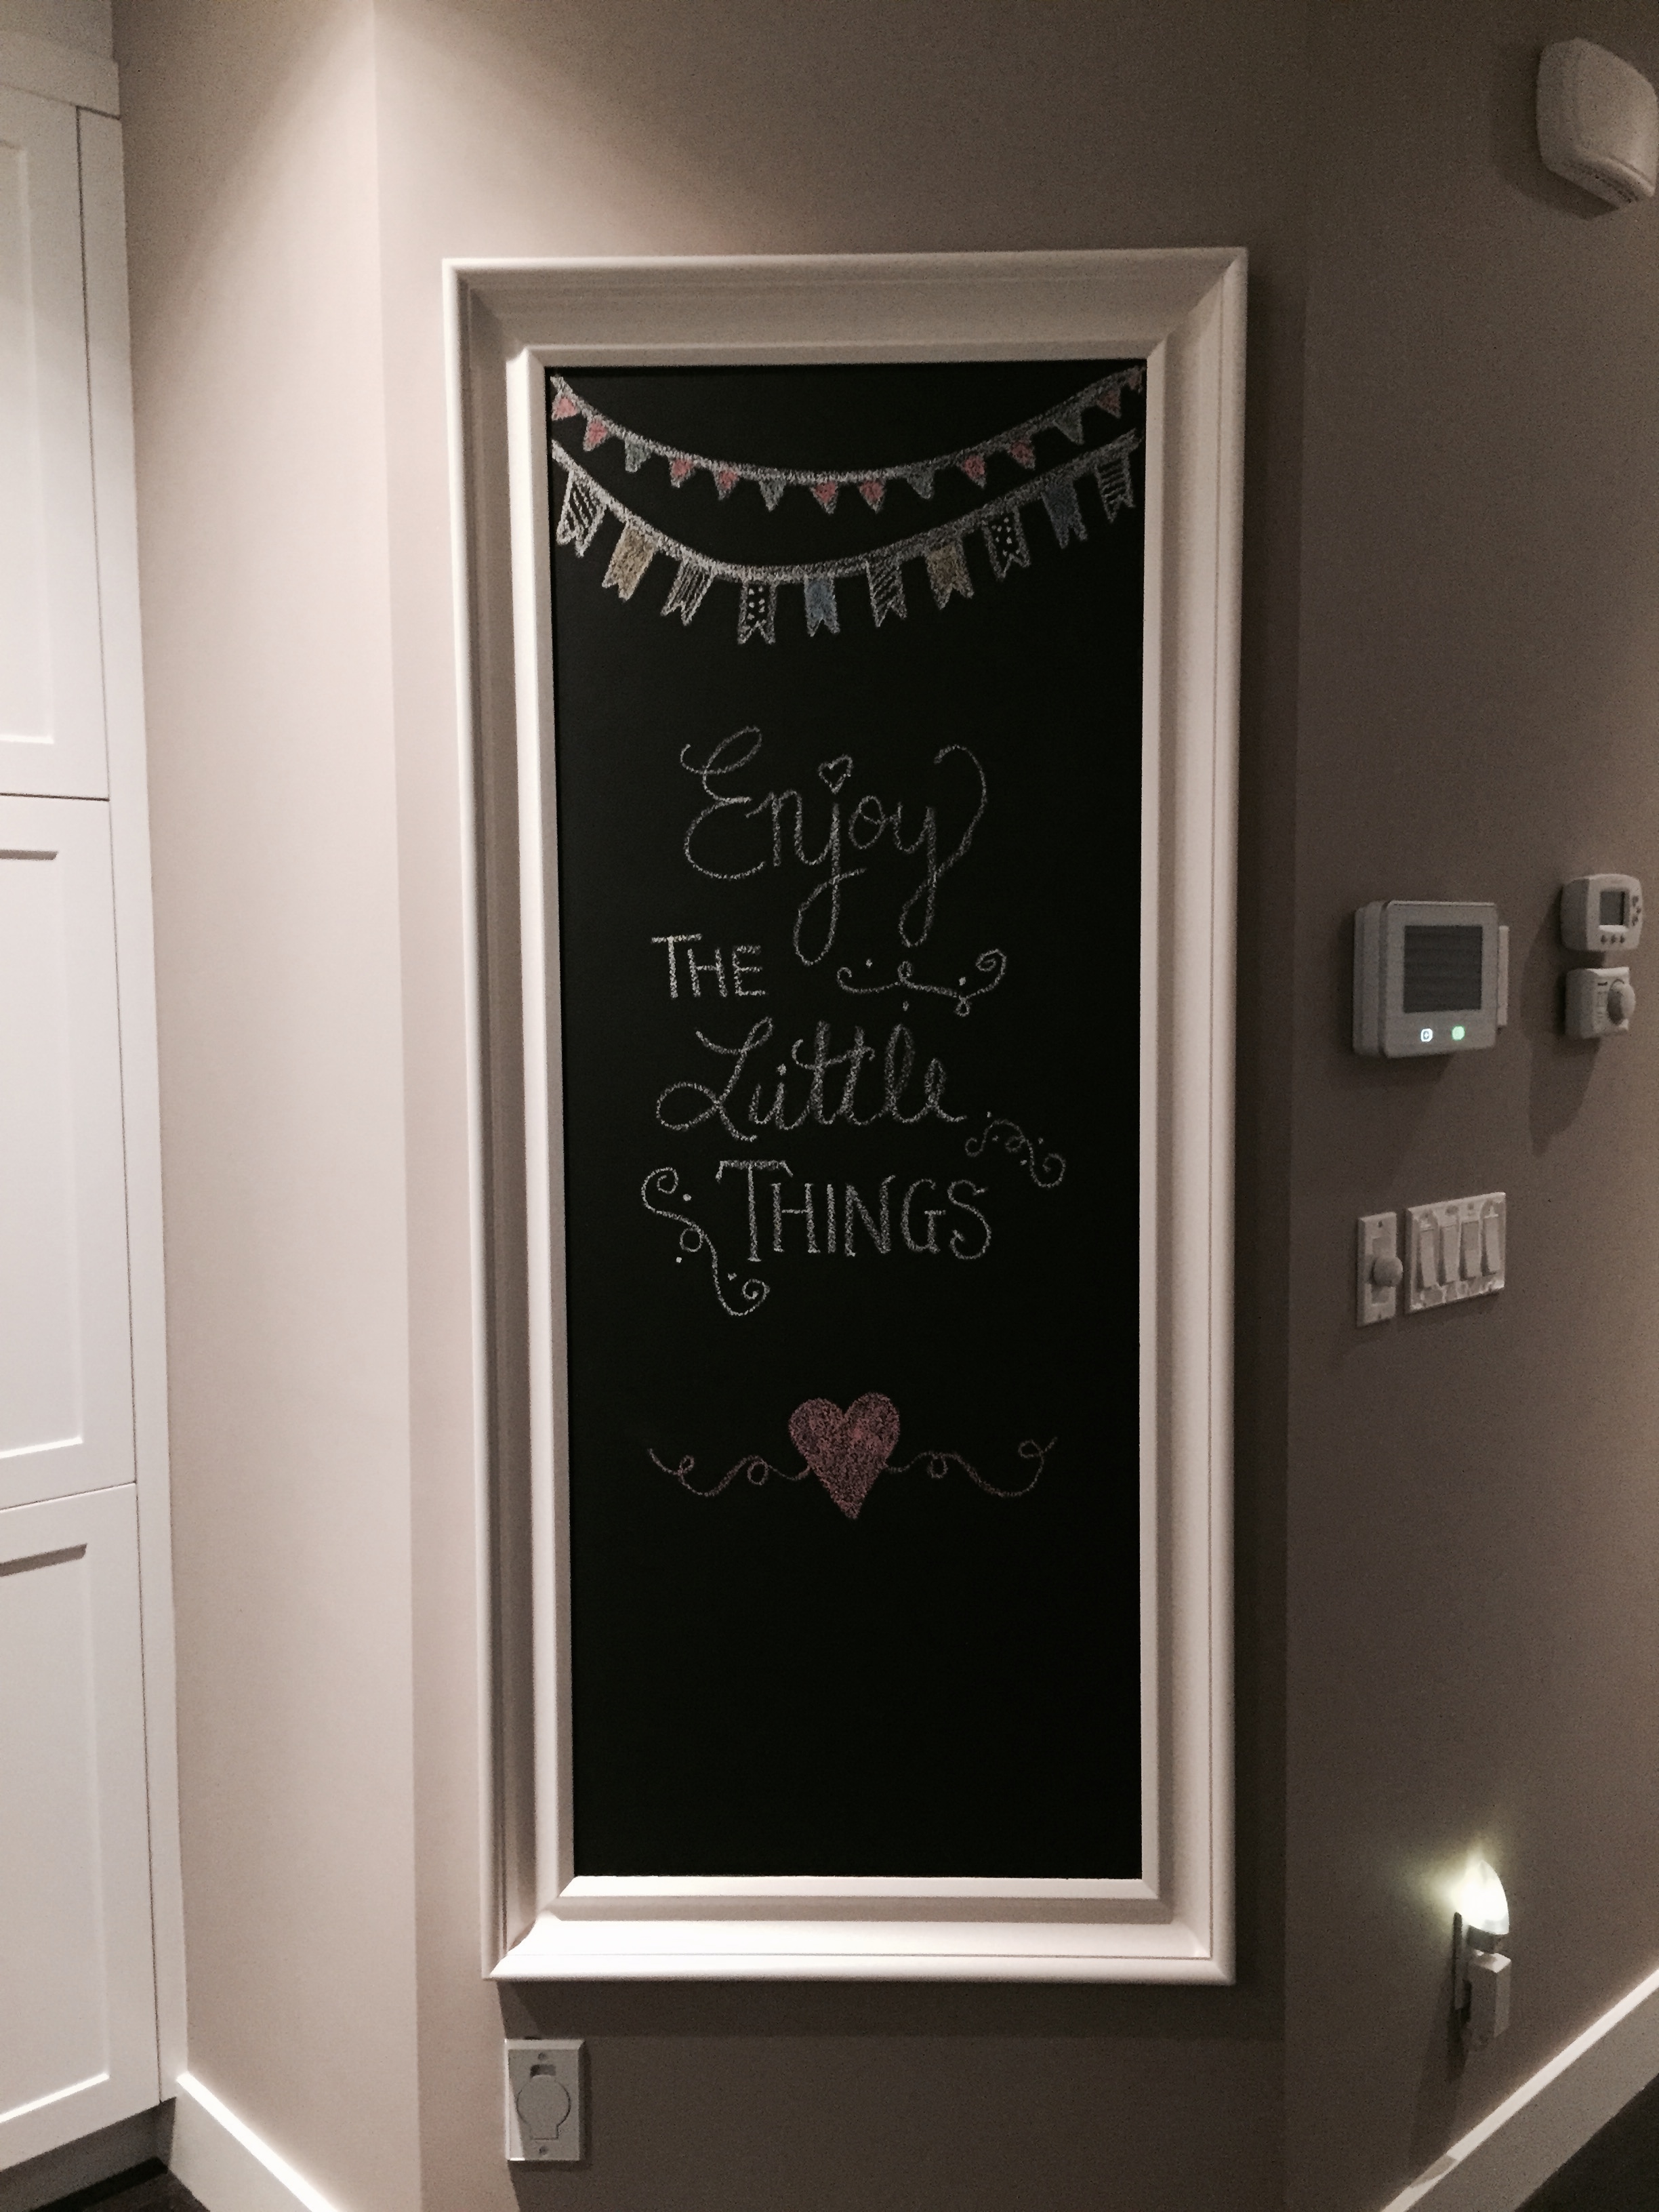
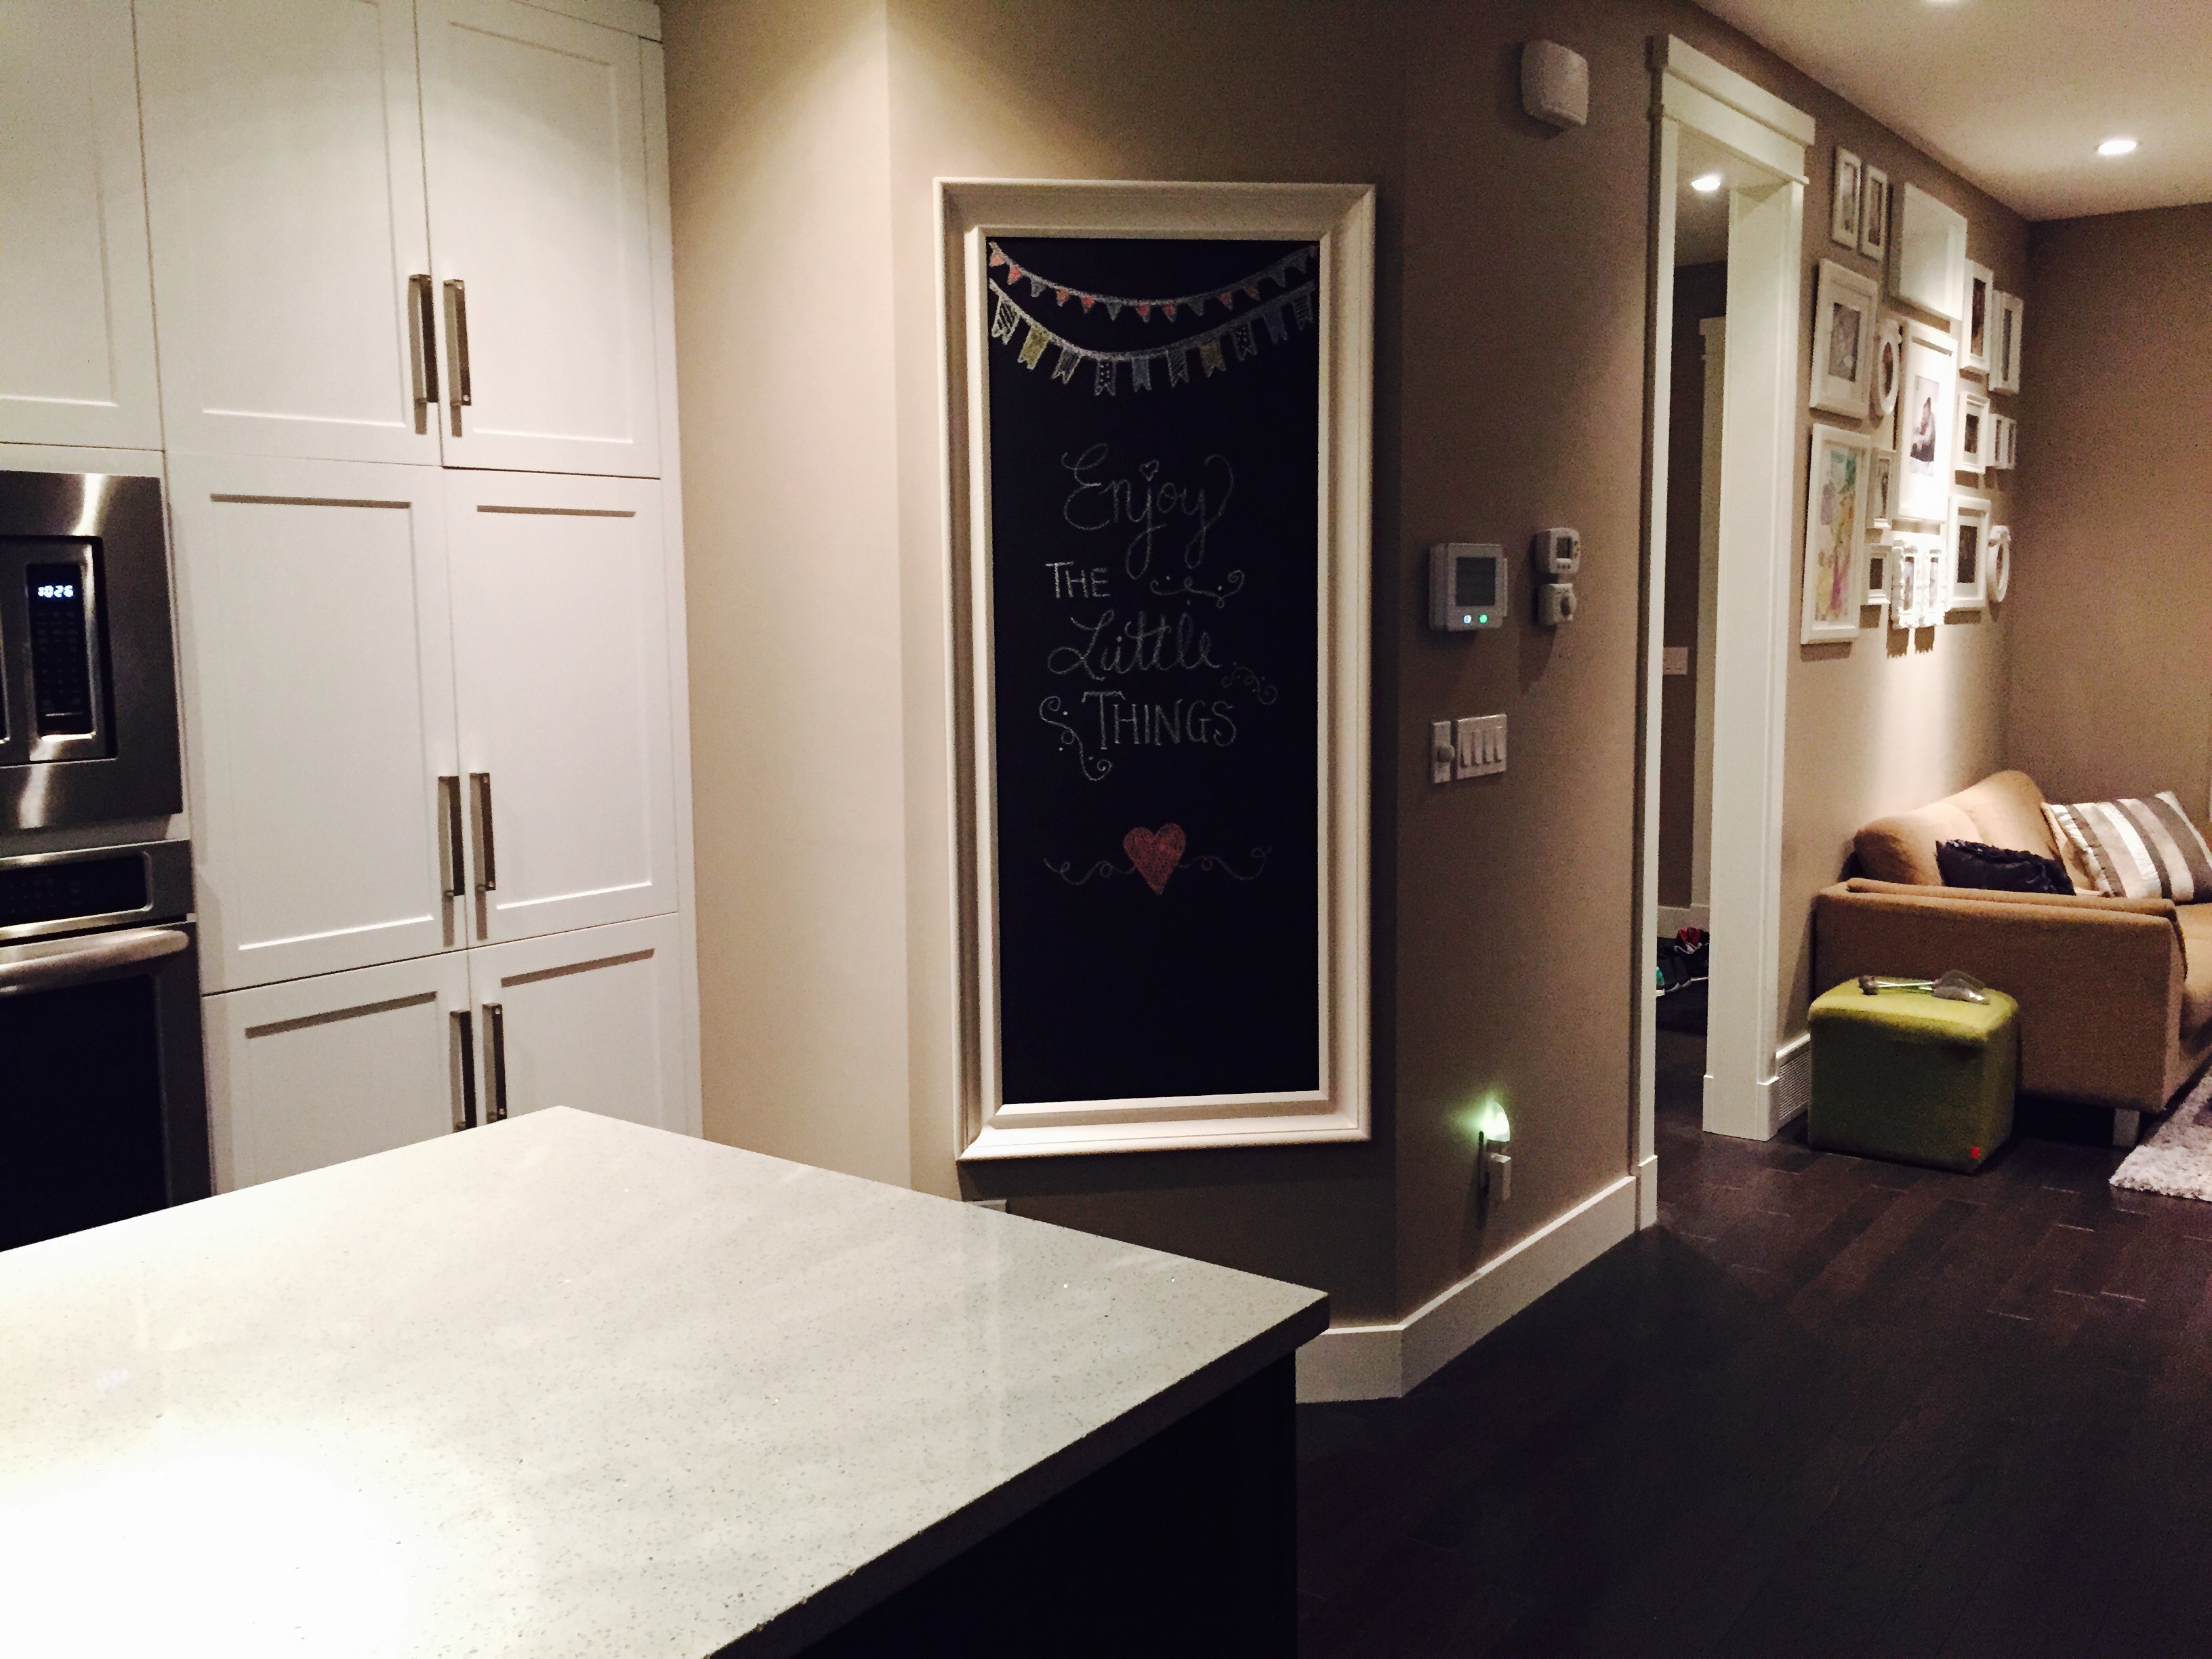
It’s almost been a year since Andrew and I moved into our beautiful home and we have recently been adding some final touches to make it exactly what we want! After spending lots of time on Pinterest and home decor blogs, we decided that we wanted to create a chalkboard wall on one of the kitchen walls to give the room a little character. Andrew researched several ways to design the wall and in the end, found a really cool idea involving a full length mirror, magnetic paint, and chalkboard paint. The whole process was super easy! We had a white full length mirror in our bedroom from Ikea that we decided to use (and later bought a really beautiful rose gold ornate mirror from Homesense to replace ours – win win)! We used painter’s tape to protect the trim and when ready, primed the mirror with 3 coats of magnetic paint. Once the paint was dry, we then layered on two coats of the chalkboard paint. Of course we allowed the recommended amount of drying time in between each coat of magnetic and chalkboard paint. After the paint had completely dried, Andrew hung the mirror – now chalkboard wall on the kitchen wall and we couldn’t be happier with the results! It’s such a cool and easy way to add something unique and creative in your home without spending a ton of money. I have definitely been having so much fun putting my ‘artistic talent’ to use! I’d love to hear about any fun DIY projects you have completed around your homes. Comment below if you’d like to share!

Photo 2014-11-06, 10 25 35 PMPhoto 2014-11-06, 10 24 51 PMPhoto 2014-11-06, 10 25 17 PMTam-Signature-#1

Happy Thanksgiving!

Happy Thanksgiving everyone! I hope that you all enjoyed the holiday and celebrated with great family, friends, and lots of yummy food! Andrew and I celebrated Thanksgiving yesterday, and we did things a little differently this year. We usually spend the day with our family, however this year we decided to keep things a little low key and keep it just the three of us.

We started off the day by going to the Calgary Corn Maze and Farm Fest, and had a really great time! It was really fun to watch Nico experience some new things like go down a big slide (with either Andrew or myself), touch and play with the pumpkins, and see some different farm animals. He definitely seemed to enjoy himself!

Following the pumpkin patch, and after Nico’s afternoon nap, we enjoyed a really delicious Thanksgiving meal. On our menu was turkey, stuffing and gravy, sweet mashed potatoes, a mix of vegetables with cheese sauce, and some fresh garlic bread. So good!! Andrew is not a big fan of pumpkin pie, so instead we had some tasty chocolate croissant donuts. Yum! Nico is still not big into eating meat just yet, so he had a good size serving of sweet potatoes, which he ate right up!

After dinner, we went for nice family walk to the park nearby our house, where Nico tried the swing for the first time! He is still pretty small, so we used a blanket to help him sit in the swing. He absolutely loved it and smiled and laughed the whole time! His expressions were so sweet and moments like that are just so priceless and irreplaceable. Andrew and I live for those special moments.

We had such a great Thanksgiving weekend and I hope that all of you did as well! Here are some photos that highlight all of our fun! Enjoy!

DSC02448

Tam-Signature-#1

DIY Bench and Cushion

Hi everybody! Sorry for my lack of posts lately. Nico is teething (even though there are no teeth yet) so the past week and a half has been a little tough, leaving me with no time to add to my blog. Anyways, I’m back now and wanted to show you a little DIY project that I finished a few days ago. I’m not a super crafty person, however I’ve been getting more and more into do-it-yourself projects, and I am so proud and impressed with how my DIY bench and cushion turned out! Andrew and I had this old little brown bench that we bought from Ikea quite a few years ago, and were planning to give away of it because it didn’t match with any of our home decor. We eventually changed our minds and decided to freshen it up with some white spray paint and a custom cushion. Andrew did all of the spray painting (and did an amazing job at that) and I was in charge of making the cushion to sit on top of the bench. I couldn’t believe how easy it was and loved the final result! All I needed to make the cushion was a piece of plywood measured and cut to fit the bench from Home Depot, the fabric of my choice and foam from Fabricland (I was surprised at how expensive the foam was), and a staple gun. I followed this tutorial and I was literally finished within 5 minutes! The last thing that we did was added screws from underneath the bench into the plywood to make sure that the cushion would stay in place. This project was so easy and the bench looks so beautiful! It definitely makes me so excited to get crafty and try new DIY ideas!

This bench used to be brown and dingy looking, and now it looks amazing!
This bench used to be brown and dingy looking, and now it looks so beautiful! It’s amazing what a fresh coat of paint will do!
Photo 2014-10-03, 2 46 37 PM
I chose this pretty damasque fabric and I am so in love with it! Black and white is just so elegant and classic!

Tam-Signature-#1

My Luxe Box

Luxe Box is seasonal beauty subscription service that I have been subscribed to for a couple of years now. Every three months, I receive my new box and it’s always so exciting to see what products will be delivered to my doorstep! This is definitely a great concept if you are someone who loves beauty and experimenting with new products, and I really love the fact that it introduces me to great products from brands that I am unfamiliar with, as well as some of my existing favorites. I just received my September Luxe Box yesterday so I thought that I would show you what it looked like, as well as a description of the products that were included. If you are into makeup and beauty products like I am, I would absolutely recommend for you to check out the Luxe Box website. It’s a great way to discover and play with new products, and it is so fun to receive your beauty box in the mail every few months!

Super cute Luxe Box packaging.
Some more cute packaging.
This season's products!
This season’s products!
High & Dry Matte Volume and Finish Spray - by AG Hair
AG Hair – High & Dry
Matte Volume and Finish Spray
Universal Blush - by So Susan
Universal Blush – So Susan
Aqua Veil Pure Hydration Serum - by Amarte Aqua Cream - by Amarte
Aqua Veil Pure Hydration Serum – by Amarte
Aqua Cream – by Amarte
Fan Brush - by Loose Button
Fan Brush – by Loose Button
Tropical Scents Body Lotion - by Lila Grace
Tropical Scents Body Lotion – by Lila Grace
Lip Gloss in "Ruby Moon" - by Burt's Bees®
Lip Gloss in “Ruby Moon” – by Burt’s Bees®

Tam-Signature-#1

Nico Loves Avocado!

Seriously, how cute is he? I just can’t get enough of this little muffin!!!

Photo 2014-09-22, 9 19 01 AM
Yum! The avocado is so good he even got some in his eyebrows! And he loves chewing on his bowl when he’s finished eating.

Tam-Signature-#1

A Few of my Fall Favorites

I know that I’ve already said it, but I am so in love with the Fall! I love when the weather gets a little more fresh, crisp and cool, I love watching the leaves change colors, and I love dressing in warm and cozy, yet stylish clothes! Also, my birthday is in October so I’m sure that’s another reason why I just love the season so much! To express my excitement for this time of year, I thought it would be fun to write a blog post dedicated to some of my favorite Fall pieces. Let me know in the comment section below what some of your Fall must haves are. I would love to hear from you!

Tam-Signature-#1

A Mama Must Have: The Pyttig Support Pillow and Cover

When it came time to purchase a highchair for our little man, Andrew and I didn’t want to go overboard and spend a ridiculous amount of money, so after some research, we decided to go with the Blames Highchair from Ikea. This highchair is very simple, affordable, space efficient, easy to clean, and sleek looking, and it had some really great reviews. Furthermore, as a bonus for me, it matches my kitchen and dining rom which is a detail that I loved! In addition to purchasing the Blames highchair, we also bought the Pyttig Support Pillow and Cover to insert into the highchair to provide support and comfort for Nico while he is sitting in his chair. The inside piece is inflatable so all you have to do is blow it up with air to the desired firmness, insert the piece into the fabric cover, zip it up, and it’s ready to use! I absolutely love this product! Nico is so comfortable when sitting in his high chair and the pillow provides him with extra stability. I also love this pillow because it protects his head if he were to hit it on the back of his chair. I especially find this product to be useful when we go out to eat. Most restaurant highchairs are super simple with no type of cushion, so Andrew and I always make sure to bring Nico’s pillow when we dine out (we keep an extra pillow in the car so that we always have one with us). It just makes things so much easier and it’s so nice to know that Nico is comfortable sitting in a chair that is not his. I really love how something so simple can be so convenient and useful!

Blames Highchair with the Pyttig Support Pillow and Cover
2014-09-17 14.56.53
Close up look
One side is navy striped...
One side is navy striped…
The other side is red striped

Tam-Signature-#1

Sally Hansen Miracle Gel Nail Polish

If you know me, then you know that I am a girly girl who always has nail polish on my fingers and my toes! I have loved nail polish since I was a little girl and it is very rare that you will catch me not wearing any color on my nails. So you can imagine how excited I was when I discovered that Sally Hansen had come out with Miracle Gel – a nail polish that acts similar to a shellac polish but without the need for a lamp. I am a huge fan of shellac polish (a formula that can last on your nails for 2-3 weeks without chipping or peeling), however I don’t always have the time to get my nails done at the salon, so I was super excited to learn that I could get a shellac looking manicure without actually having to go to the salon! Although I do love pampering myself with a professional mani and pedi every once in a while, it’s so great to know that I can actually get great results doing it myself at home for a fraction of the time and cost of a salon manicure. Sally Hansen offers a variety of Miracle Gel colors, and it is super easy to use – apply two coats of the Miracle Gel color of your choice, followed by one coat of the top coat and let dry! I have done shellac on my nails at home using a lamp and I love the fact that Miracle Gel does not require a lamp. It definitely saves so much time and patience! I can already say that this nail polish is my current favorite (and I have tried pretty much every polish out there), so it gets a a huge thumbs up from me!

These are the three colors (and top coat) that I have purchased. From left to right: Top Coat, Wine Stock, Red Eye, and Throwing Shade.
These are the three colors (and top coat) that I have purchased. From left to right: Top Coat, Wine Stock, Red Eye, and Shock Wave.
In this photo I am wearing Wine Stock (my favorite color so far - especially for the Fall), and this picture was taken five days after I had applied the polish!
In this photo I am wearing Wine Stock (my favorite color so far – especially for the Fall), and this picture was taken five days after I had applied the polish! I am so impressed with the long lasting effects of this nail polish!

Tam-Signature-#1

My Fall Tablescape

Fall is my absolute favorite season and I am so happy and excited that it’s almost here! In Calgary, the Fall doesn’t seem to last too long (sadly, it usually starts to snow quite early) so I definitely take what I can get by enjoying my favorites from boots and scarves to pumpkin spice everything! As the seasons change, so does some of the decor in my house. I thought that it would be fun to share with you the current look of my living room coffee table. I like the simplicity of it all and I’m really happy with how the table turned out! I love themes so as we approach new seasons, holidays, and occasions, I always make sure to give my house a few extra special touches in order to match. I hope you like what I’ve done!

Photo 2014-09-13, 8 40 06 AM (HDR)

Tam-Signature-#1

Younique Moodstruck 3D Fiber Lashes Mascara

I came across the Younique Moodstruck 3D Fiber Lashes Mascara a few months ago but was hesitant to try it only because it was quite expensive ($45 after taxes and shipping). I have always purchased mascaras from the drug store and have found quite a few that I love, so I didn’t see a need for me to get this specific one. However, after seeing several before and after pictures of the mascara on Instagram, I decided that it looked way too good to pass up, so I went ahead and ordered it. I received the product within the week and couldn’t wait to give it a try! Today was the first day that I got to test it out, and after having used this mascara, I have to say that I absolutely LOVE it!!! Although it does take some time to apply this product onto my lashes (it takes at least four steps to achieve the desired look), the results definitely make it worth it! I think that the bigger the lashes are, the better, and I couldn’t believe how much longer and more voluminous my lashes were after applying this mascara. I definitely recommend this product to anyone who loves long, full, and sexy lashes!

My lashes before applying the mascara
My lashes after applying the mascara
Look at that length!
Super cute packaging!
Intense
Intense

Tam-Signature-#1